Lessons learned refactoring Pulumi programs
Introduction
So you built your first Pulumi program? Maybe even got some workloads running in production? The team loves it, the thing just works. People are adopting it, adding components, importing more of the existing resources. The stacks are getting bigger… and bigger.
Overnight, what was a simple proof of concept before turns into a 200+ lines of infrastructure code. You look to the community for some best practices: how to structure this thing, how to break it up? How to add some unit tests maybe?
In this article, let’s refactor a Pulumi program and break it down into more re-usable components. The components will be more maintainable and bingo testable. Because there is a bunch of changes to make, we’ll make so incrementally.
This is a problem that many people bump into and most people just want/need guidance and simple rules of thumb to structure their code. What should be a really interesting and valuable proposition (“unit testing you infrastructure code”) becomes hard to achieve.
Other posts in this series
Getting a “lay of the land”
Over the last three posts in this series, we worked on a simple static web app (React).
We went from a simple S3 bucket architecture, to a solution with a CDN, a domain record and a proper SSL certificate.
But as time went on the index.ts became bigger and bigger.
This is what it looks like now.
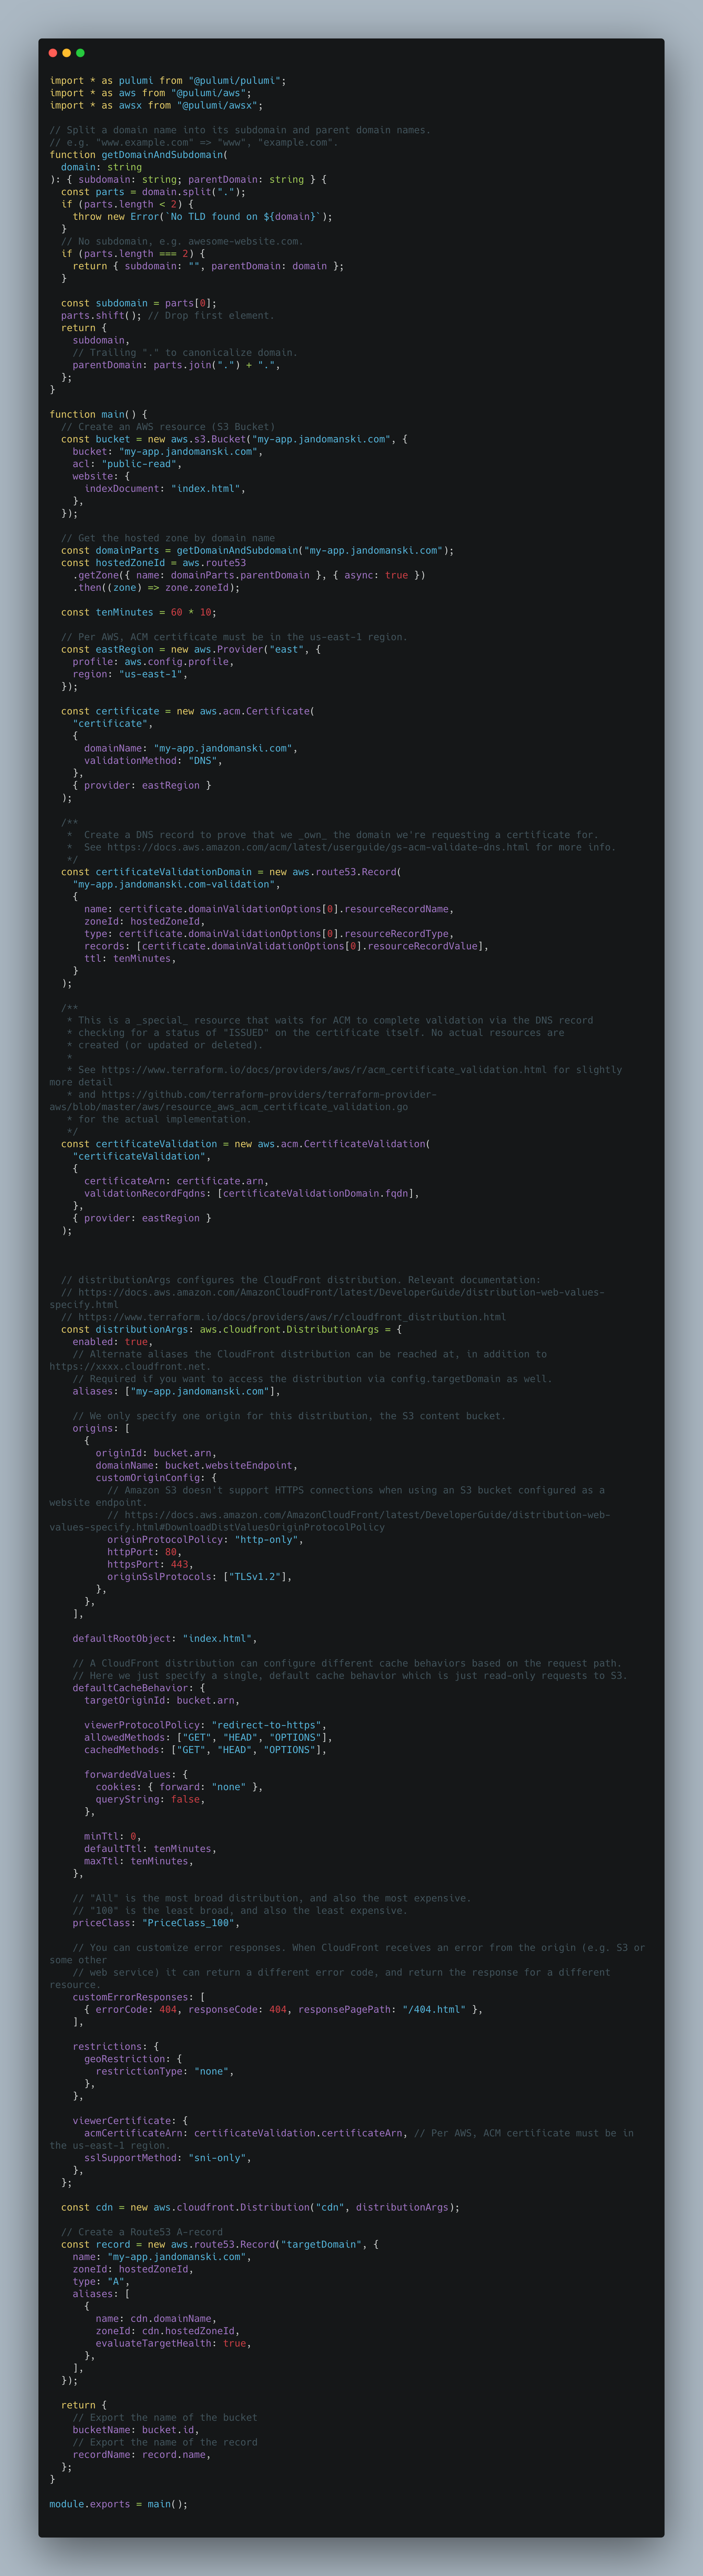
Well this is an unholy messy! Let’s see if we can get from the mess above to neat and tidy the index.ts below.
This truly sparks Marie Kondo-levels of joy! But how do we make it happen?
Refactoring with Janski
Figuring out how to split things out
Let’s have a look at the monster index.ts and see which things we might split off. Color-coding to help the eye.
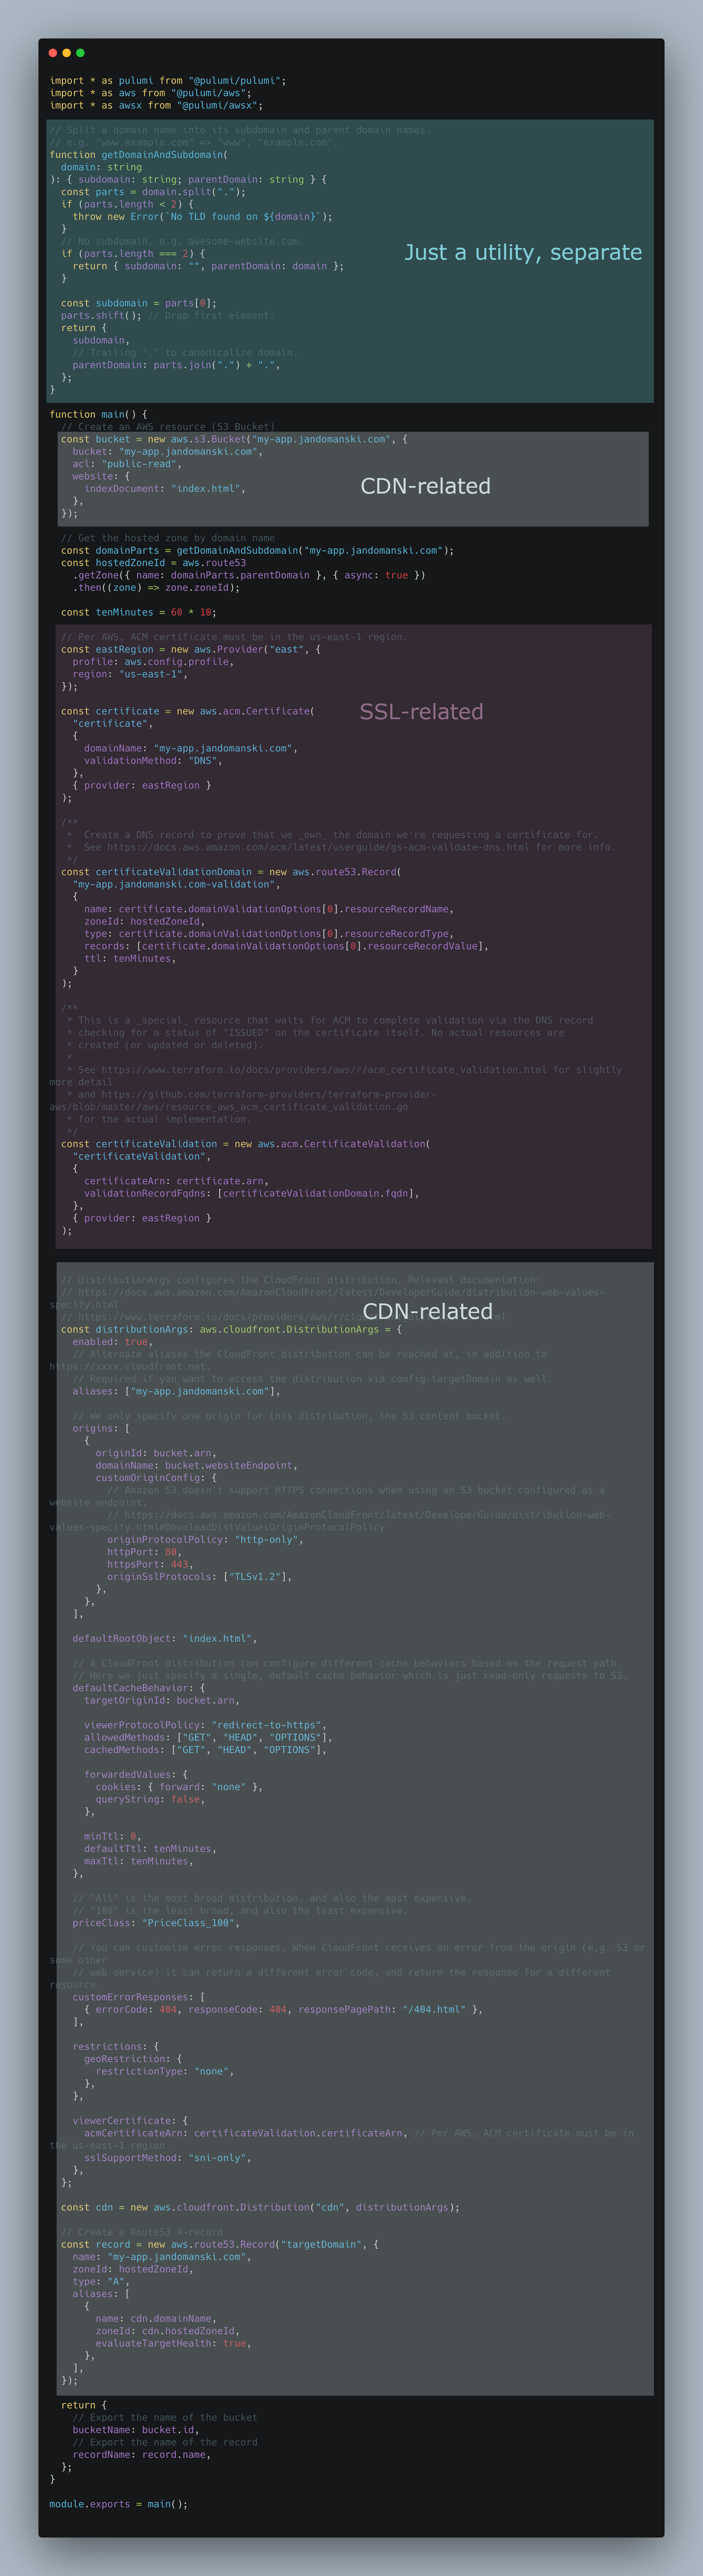
We can already see three potential improvements:
- stuff related to the Content Delivery Network (S3 bucket, the CDN itself, and the domain record)
- stuff related to the SSL certificate (could come useful, just as a generic “hey get me an SSL for blah”)
- a utility function
getDomainAndSubdomainand a constanttenMinutes
Beyond this, the domain name is repeated over and over – just a copy pasted string. That string constant can be easily factored out as a Pulumi config. So let’s get started in reverse order!.
Avoiding domain name repetition
You probably noticed the domain name my-app.somedomain.com being endlessly copy&pasted in the code.
This is obviously not good practice but it was simple enough to get started.
It can be simply refactored by using the Pulumi config component.
In your terminal simply define a new config value
pulumi config set targetDomain my-app.somedomain.com
This should now update the Pulumi.dev.yaml to look something like this
encryptionsalt: <SOME RANDOM SALT>
config:
  aws:region: eu-west-1
  my-app:targetDomain: my-app.somedomain.com
Now the only thing that remains is to make our Pulumi program index.ts aware of this code.
function main() {
  const stackConfig = new pulumi.Config("my-app");
  const config = {
    // targetDomain is the domain/host to serve content at.
    targetDomain: stackConfig.require("targetDomain"),
  };
}
Now the config.targetDomain can be used to configure the various resources in your program.
Pulling out a simple utils function
The index.ts starts with a simple utility function, this is the simplest refactor of all – the function should just go into a separate util.ts file.
While we’re at it, let’s also put the tenMinutes constant in there.
// src/utils.ts
import * as aws from "@pulumi/aws";

export const tenMinutes = 60 * 10;

// Split a domain name into its subdomain and parent domain names.
// e.g. "www.example.com" => "www", "example.com".
export function getDomainAndSubdomain(
  domain: string
): { subdomain: string; parentDomain: string } {
  const parts = domain.split(".");
  if (parts.length < 2) {
    throw new Error(`No TLD found on ${domain}`);
  }
  // No subdomain, e.g. awesome-website.com.
  if (parts.length === 2) {
    return { subdomain: "", parentDomain: domain };
  }

  const subdomain = parts[0];
  parts.shift(); // Drop first element.
  return {
    subdomain,
    // Trailing "." to canonicalize domain.
    parentDomain: parts.join(".") + ".",
  };
}
Refactoring the SSL certificate code
The interesting stuff starts now. In the index.ts, the code looks like this.
  // Per AWS, ACM certificate must be in the us-east-1 region.
  const eastRegion = new aws.Provider("east", {
    profile: aws.config.profile,
    region: "us-east-1",
  });

  const certificate = new aws.acm.Certificate(
    "certificate",
    {
      domainName: "my-app.somedomain.com",
      validationMethod: "DNS",
    },
    { provider: eastRegion }
  );

  /**
   *  Create a DNS record to prove that we _own_ the domain we're requesting a certificate for.
   *  See https://docs.aws.amazon.com/acm/latest/userguide/gs-acm-validate-dns.html for more info.
   */
  const certificateValidationDomain = new aws.route53.Record(
    "my-app.somedomain.com-validation",
    {
      name: certificate.domainValidationOptions[0].resourceRecordName,
      zoneId: hostedZoneId,
      type: certificate.domainValidationOptions[0].resourceRecordType,
      records: [certificate.domainValidationOptions[0].resourceRecordValue],
      ttl: tenMinutes,
    }
  );

  /**
   * This is a _special_ resource that waits for ACM to complete validation via the DNS record
   * checking for a status of "ISSUED" on the certificate itself. No actual resources are
   * created (or updated or deleted).
   *
   * See https://www.terraform.io/docs/providers/aws/r/acm_certificate_validation.html for slightly more detail
   * and https://github.com/terraform-providers/terraform-provider-aws/blob/master/aws/resource_aws_acm_certificate_validation.go
   * for the actual implementation.
   */
  const certificateValidation = new aws.acm.CertificateValidation(
    "certificateValidation",
    {
      certificateArn: certificate.arn,
      validationRecordFqdns: [certificateValidationDomain.fqdn],
    },
    { provider: eastRegion }
  );
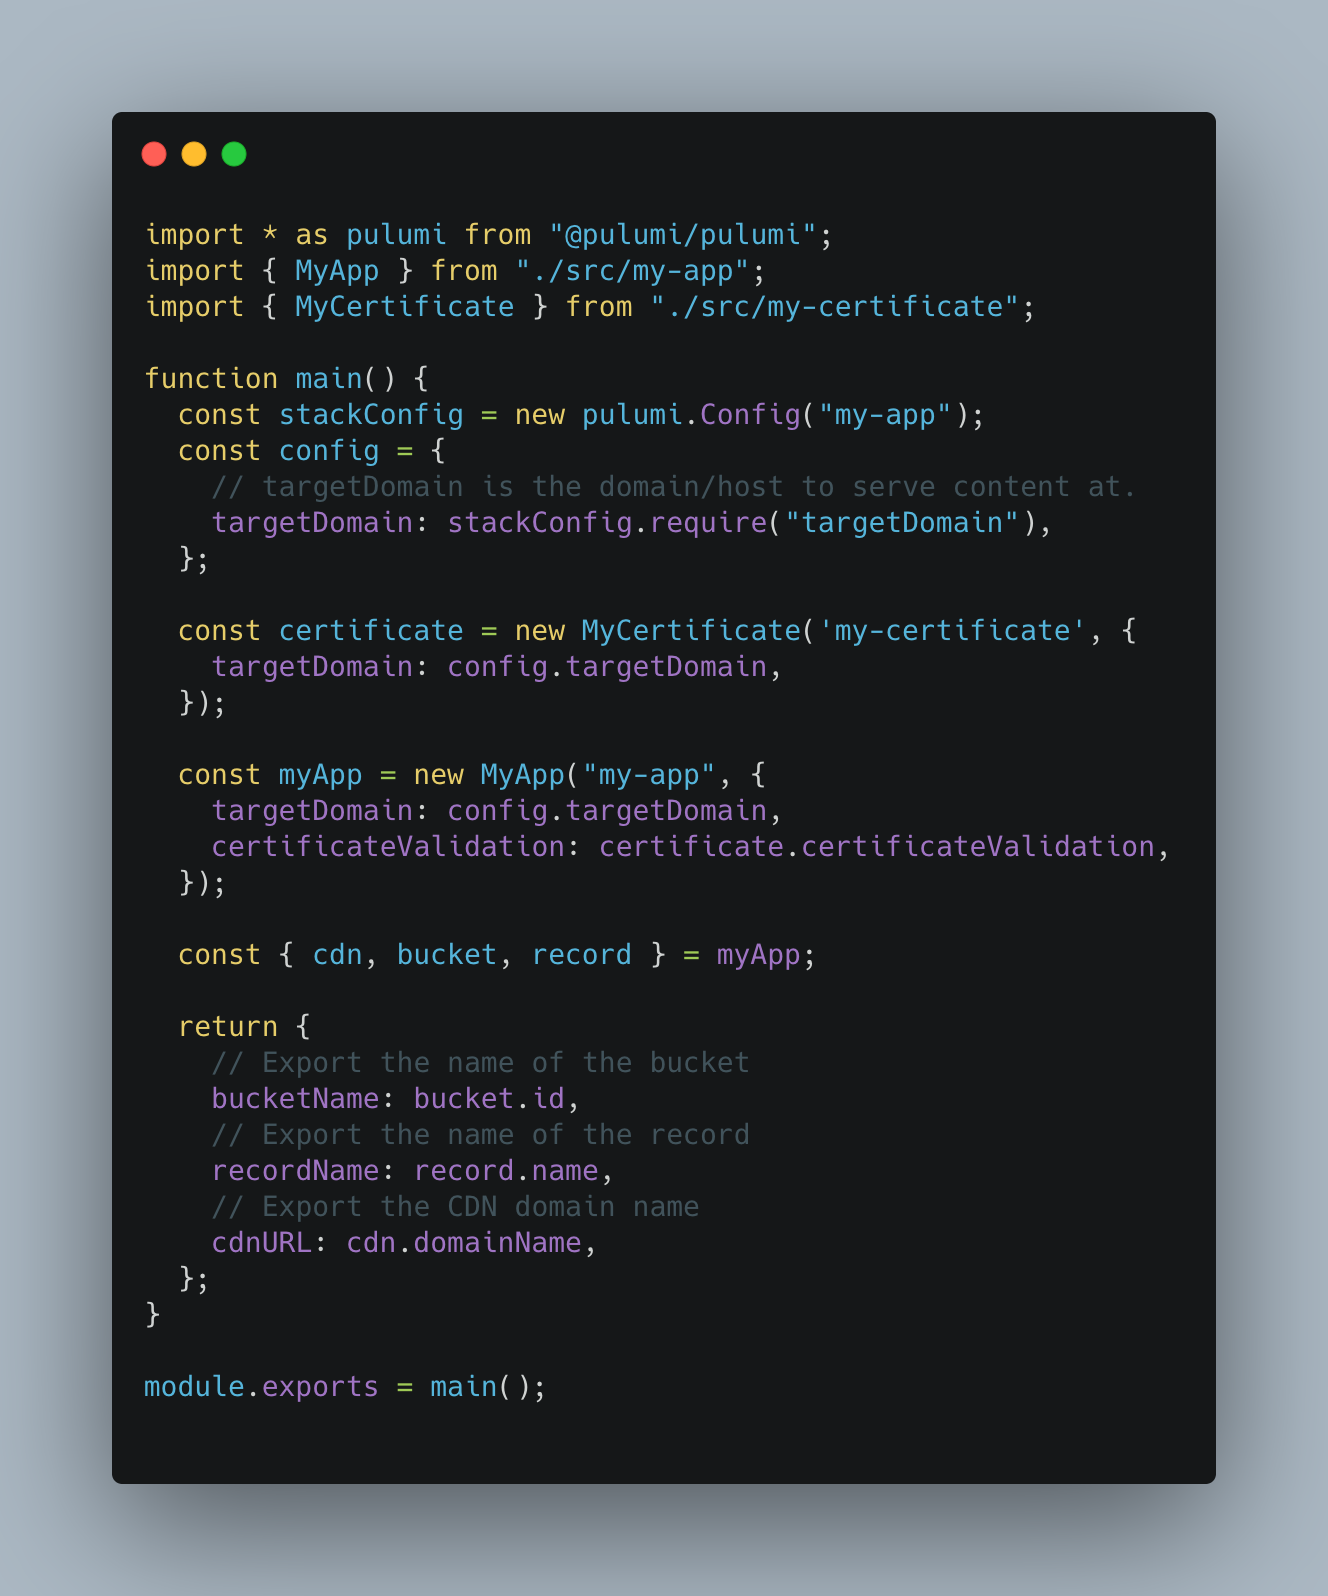
What’s a good way to refactor this? Let’s refactor this into a “component resource”.
Looking top-down, how could we use this component from index.ts?
import { MyCertificate } from "./src/my-certificate";

...

function main() {
  const stackConfig = new pulumi.Config("my-app");
  const config = {
    // targetDomain is the domain/host to serve content at.
    targetDomain: stackConfig.require("targetDomain"),
  };

  const certificate = new MyCertificate('my-certificate', {
    targetDomain: config.targetDomain,
  });
}
Wouldn’t that be neat, huh?
A reusable way to generate an SSL certificate for any domain.
Well, here is how you do that.
All the same components appear again.
The special sauce here is { parent: this } which attaches all the resources to the component resource.
Curiously, it can be used to nest multiple components inside another, more than one level deep, when that’s needed.
// Created a new file in src/my-certificate/index.ts

import * as pulumi from "@pulumi/pulumi";
import * as aws from "@pulumi/aws";

import { getDomainAndSubdomain, tenMinutes } from "../utils";

export class MyCertificate extends pulumi.ComponentResource {
  certificate: aws.acm.Certificate;
  certificateValidation: aws.acm.CertificateValidation;

  constructor(
    name: string,
    args: {
      targetDomain: string;
    },
    opts: any = {}
  ) {
    super("pkg:index:Certificate", name, {}, opts);
    const { targetDomain } = args;

    // Per AWS, ACM certificate must be in the us-east-1 region.
    const eastRegion = new aws.Provider(
      "east",
      {
        profile: aws.config.profile,
        region: "us-east-1",
      },
      { parent: this }
    );

    this.certificate = new aws.acm.Certificate(
      "certificate",
      {
        domainName: targetDomain,
        validationMethod: "DNS",
      },
      { provider: eastRegion, parent: this }
    );

    const domainParts = getDomainAndSubdomain(targetDomain);
    const hostedZoneId = aws.route53
      .getZone({ name: domainParts.parentDomain }, { async: true })
      .then((zone) => zone.zoneId);

    /**
     *  Create a DNS record to prove that we _own_ the domain we're requesting a certificate for.
     *  See https://docs.aws.amazon.com/acm/latest/userguide/gs-acm-validate-dns.html for more info.
     */
    const certificateValidationDomain = new aws.route53.Record(
      `${targetDomain}-validation`,
      {
        name: this.certificate.domainValidationOptions[0].resourceRecordName,
        zoneId: hostedZoneId,
        type: this.certificate.domainValidationOptions[0].resourceRecordType,
        records: [this.certificate.domainValidationOptions[0].resourceRecordValue],
        ttl: tenMinutes,
      },
      {
        parent: this,
      }
    );

    /**
     * This is a _special_ resource that waits for ACM to complete validation via the DNS record
     * checking for a status of "ISSUED" on the certificate itself. No actual resources are
     * created (or updated or deleted).
     *
     * See https://www.terraform.io/docs/providers/aws/r/acm_certificate_validation.html for slightly more detail
     * and https://github.com/terraform-providers/terraform-provider-aws/blob/master/aws/resource_aws_acm_certificate_validation.go
     * for the actual implementation.
     */
    this.certificateValidation = new aws.acm.CertificateValidation(
      "certificateValidation",
      {
        certificateArn: this.certificate.arn,
        validationRecordFqdns: [certificateValidationDomain.fqdn],
      },
      { provider: eastRegion, parent: this }
    );
  }
}
Refactoring the CDN component
Much like the certificate, the CDN definition is rather verbose.
Especially the DistributionArgs takes like 70 lines of code :yikes:!
  const distributionArgs: aws.cloudfront.DistributionArgs = {
    ... // a massive JS object
  }
Let’s start by putting defining a function that creates DistributionArgs inside a new file.
// Created a new file in src/my-app/index.ts

import * as pulumi from "@pulumi/pulumi";
import * as aws from "@pulumi/aws";

import { tenMinutes, getDomainAndSubdomain } from "../utils";

function createDistributionArgs(
  targetDomain: string,
  bucket: aws.s3.Bucket,
  certificateValidation: aws.acm.CertificateValidation,
  tenMinutes: number
): aws.cloudfront.DistributionArgs {
  // distributionArgs configures the CloudFront distribution. Relevant documentation:
  // https://docs.aws.amazon.com/AmazonCloudFront/latest/DeveloperGuide/distribution-web-values-specify.html
  // https://www.terraform.io/docs/providers/aws/r/cloudfront_distribution.html
  return {
    enabled: true,
    // Alternate aliases the CloudFront distribution can be reached at, in addition to https://xxxx.cloudfront.net.
    // Required if you want to access the distribution via config.targetDomain as well.
    aliases: [targetDomain],

    // We only specify one origin for this distribution, the S3 content bucket.
    origins: [
      {
        originId: bucket.arn,
        domainName: bucket.websiteEndpoint,
        customOriginConfig: {
          // Amazon S3 doesn't support HTTPS connections when using an S3 bucket configured as a website endpoint.
          // https://docs.aws.amazon.com/AmazonCloudFront/latest/DeveloperGuide/distribution-web-values-specify.html#DownloadDistValuesOriginProtocolPolicy
          originProtocolPolicy: "http-only",
          httpPort: 80,
          httpsPort: 443,
          originSslProtocols: ["TLSv1.2"],
        },
      },
    ],

    defaultRootObject: "index.html",

    // A CloudFront distribution can configure different cache behaviors based on the request path.
    // Here we just specify a single, default cache behavior which is just read-only requests to S3.
    defaultCacheBehavior: {
      targetOriginId: bucket.arn,

      viewerProtocolPolicy: "redirect-to-https",
      allowedMethods: ["GET", "HEAD", "OPTIONS"],
      cachedMethods: ["GET", "HEAD", "OPTIONS"],

      forwardedValues: {
        cookies: { forward: "none" },
        queryString: false,
      },

      minTtl: 0,
      defaultTtl: tenMinutes,
      maxTtl: tenMinutes,
    },

    // "All" is the most broad distribution, and also the most expensive.
    // "100" is the least broad, and also the least expensive.
    priceClass: "PriceClass_100",

    // You can customize error responses. When CloudFront receives an error from the origin (e.g. S3 or some other
    // web service) it can return a different error code, and return the response for a different resource.
    customErrorResponses: [
      { errorCode: 404, responseCode: 404, responsePagePath: "/404.html" },
    ],

    restrictions: {
      geoRestriction: {
        restrictionType: "none",
      },
    },

    viewerCertificate: {
      acmCertificateArn: certificateValidation.certificateArn, // Per AWS, ACM certificate must be in the us-east-1 region.
      sslSupportMethod: "sni-only",
    },
  };
}
Pulling out this verbose chunk, we can define a new component resource in the same file.
Let’s go ahead and update src/my-app/index.ts.
// Editing in src/my-app/index.ts
export class MyApp extends pulumi.ComponentResource {
  bucket: aws.s3.Bucket;
  cdn: aws.cloudfront.Distribution;
  record: aws.route53.Record;

  constructor(
    name: string,
    args: {
      targetDomain: string;
      certificateValidation: aws.acm.CertificateValidation;
    },
    opts: any = {}
  ) {
    super("pkg:index:MyApp", name, {}, opts);
    const { targetDomain, certificateValidation } = args;
    // Create an AWS resource (S3 Bucket)
    this.bucket = new aws.s3.Bucket(
      targetDomain,
      {
        bucket: targetDomain,
        acl: "public-read",
        website: {
          indexDocument: "index.html",
        },
      },
      { parent: this }
    );

    const distributionArgs = createDistributionArgs(
      targetDomain,
      this.bucket,
      certificateValidation,
      tenMinutes
    );

    this.cdn = new aws.cloudfront.Distribution("cdn", distributionArgs, {
      parent: this,
    });

    const domainParts = getDomainAndSubdomain(targetDomain);
    const hostedZoneId = aws.route53
      .getZone({ name: domainParts.parentDomain }, { async: true })
      .then((zone) => zone.zoneId);

    // Create a Route53 A-record
    this.record = new aws.route53.Record(
      "targetDomain",
      {
        name: targetDomain,
        zoneId: hostedZoneId,
        type: "A",
        aliases: [
          {
            name: this.cdn.domainName,
            zoneId: this.cdn.hostedZoneId,
            evaluateTargetHealth: true,
          },
        ],
      },
      { parent: this }
    );
  }
}
And voila, another nice component resource to include in index.ts. Looking top-down here is how it can used?
import { MyApp } from "./src/my-app";

...

function main() {
  const stackConfig = new pulumi.Config("my-app");
  const config = {
    // targetDomain is the domain/host to serve content at.
    targetDomain: stackConfig.require("targetDomain"),
  };

  const certificate = new MyCertificate('my-certificate', {
    targetDomain: config.targetDomain,
  });

  const myApp = new MyApp("my-app", {
    targetDomain: config.targetDomain,
    certificateValidation: certificate.certificateValidation,
  });
}
Wrapping up here are some follow-up resources. I found nothing about best way to structure pulumi projects, so I just improvised here – this is what worked for me.
- The topic of component resources is covered briefly in the Programming Model of Pulumi docs,
- There also appears to be a nice official tutorial with an S3 bucket example.
Visual improvement in project structure
And you know what’s great? The structure of the stack resources is visibly improved.
Initially the output of pulumi refresh looked something like this
$ pulumi refresh -y
Previewing refresh (dev):
     Type                              Name                               Plan
     pulumi:pulumi:Stack               my-app-dev
     ├─ pulumi:providers:aws           east
     ├─ aws:acm:CertificateValidation  certificateValidation
     ├─ aws:acm:Certificate            certificate
     ├─ aws:route53:Record             my-app.somedomain.com-validation
     ├─ aws:s3:Bucket                  my-app.somedomain.com
     ├─ aws:route53:Record             targetDomain
     └─ aws:cloudfront:Distribution    cdn

Resources:
    8 unchanged
All the resources are a flat list, without any visual linkage or grouping between them. However, after our little refactoring this now looks much cleaner, with resources being grouped logically.
$ pulumi refresh
Previewing refresh (dev):
     Type                                 Name                               Plan
     pulumi:pulumi:Stack                  my-app-dev                         running...
     ├─ pkg:index:Certificate             my-certificate
     │  ├─ pulumi:providers:aws           east
     │  ├─ aws:acm:CertificateValidation  certificateValidation
     │  ├─ aws:route53:Record             my-app.somedomain.com-validation
     │  └─ aws:acm:Certificate            certificate
     └─ pkg:index:MyApp                   my-app
        ├─ aws:route53:Record             targetDomain
        ├─ aws:s3:Bucket                  my-app.somedomain.com             refreshing...
        └─ aws:cloudfront:Distribution    cdn
Unit testing resource components
Some of you might be thinking “wait, what? unit testing infrastructure? I thought you could only big integration tests where infrastructure is spun up?”.
Well, prepare your mind to be blown.
Pulumi mocks cloud provider responses allowing you to mock that a fake piece of infrastructure is created.
Relative to tests with jest that you might be familiar with, things are a bit more awkward here but still okay.
Let’s start by building a unit test for the MyCertificate component. What does this test need to include? Well, my certificate internall creates at least two resources:
- Certificate –
aws:acm/certificate:Certificate - CertificateValidation –
aws:acm/certificateValidation:CertificateValidation
So for both of these a mock is needed.
Pulumi exposes an API for unit testing via pulumi.runtime.setMocks that allows for API responses to be mocked.
Here is how you can start
// Create a new file in src/my-certificate/index.test.ts

import * as pulumi from "@pulumi/pulumi";
import * as assert from "assert";
import "mocha";

pulumi.runtime.setMocks({
  newResource: function (
    type: string,
    name: string,
    inputs: any
  ): { id: string; state: any } {
    switch (type) {
      case "aws:acm/certificate:Certificate":
        return {
          id: inputs.name + "_id",
          state: {
            ...inputs,
            arn: "arn:aws:some-cert-arn",
          },
        };
      case "aws:acm/certificateValidation:CertificateValidation":
        return {
          id: inputs.name + "_id",
          state: {
            ...inputs,
          },
        };
      default:
        return {
          id: inputs.name + "_id",
          state: {
            ...inputs,
          },
        };
    }
  },
  call: function (token: string, args: any, provider?: string) {
    return args;
  },
});
That’s a little verbose but gives us control on the state of the returned object.
For example, see you the ARN is set on the Certificate via arn: "arn:aws:some-cert-arn".
Next, we import the module under test, and write down the tests as usual using describe() definitions.
// Continuing in src/my-certificate/index.test.ts

// It's important to import the program _after_ the mocks are defined.
import * as infra from "./index";

describe("MyCertificate", function () {
  const targetDomain = "some.domain.com";
  const resource = new infra.MyCertificate("my-certificate", {
    targetDomain,
  });
  it("must have a targetDomain", function (done) {
    pulumi.all([resource.certificate.domainName]).apply(([domainName]) => {
      assert.equal(domainName, targetDomain);
      done();
    });
  });
  it("must have a certificateValidation", function (done) {
    pulumi
      .all([resource.certificateValidation.certificateArn])
      .apply(([certificateArn]) => {
        assert.equal(certificateArn, "arn:aws:some-cert-arn");
        done();
      });
  });
});
Two asserts are declared here:
- the certificate takes on the
targetDomainpassed from the config, - the certificateValidation gets the
arnfrom the certificate.
Simple enough and effective for this very simple component.
How do you actually run the test itself? Again it’s a bit more verbose than ideal…
node_modules/.bin/mocha -r ts-node/register src/my-certificate/index.test.ts

  MyCertificate
    ✓ must have a targetDomain
    ✓ must have a certificateValidation


  2 passing (7ms)
Further reading could include the official documentation for unit testing.
Conclusions
Refactoring
Take action before your Pulumi project becomes a long index.ts file with hundreds of resources.
You can take advantage of compound resources to break code up into smaller, re-usable chunks.
Beyond just making the code maintainable, it’ll allow you to unit-test the components in isolation.
Testing
I can’t say that I loved writing Pulumi unit tests in Typescript. It feels awkward and clunky, relative to my experience with other tools (Jest?). Despite all my love for Pulumi, you won’t hear me sing accolades here. Still, it’s infinitely better than having no unit tests at all. Together with a robust integration tests, it should be entirely possible to bring the best of testing into your infrastructure code.