Deploying a Create React App to AWS with Pulumi

Introduction
So you have just created your first app with Create React App. You built it, changed some source files. It works! Well, it works on your machine. What’s next? How do you actually get it out there, running?
You can build it but you want to ship it.
The aim of this series of posts is to provide a step-by-step, incremental improvement journey. The posts will show how to build your infrastructure, starting from the simplest configuration. What’s the point in showing you how to build the castle, if it’s not clear why one needs anything more than a shack?
This series may be particularly interesting to frontend developers who want to increase their understanding of infrastructure.
Going beyond just a cookbook recipe will be a must (troubleshooting should be an essential part of any series). When possible, debug and diagnostic commands are run to make sure things are in the state that they need to be.
This will be a big journey but if we can break it up into smaller iterative sub-steps, we’ll go from a shack to a castle.
Other posts in this series
The plan
What will we need from AWS? It is going to be a million services or just a few? For now just one: the app will need an S3 bucket to place the transpiled JS files for Create React App.

There are further wrinkles:
- How to ensure an encrypted SSL connection?
- Which caching settings to use for the resources?
- How to scale the service in the future and how to monitor it?
All these we’ll be covered in the series – we’ll be building up from the simplest shack to a more robust configuration.
To click or not to click?
What’s the gateway drug of AWS? It’s obviously the AWS console. Things are very easy to setup but once the complexity becomes larger, things get trickier. How trickier? Suppose you want to do a production environments but then also a staging and a testing environments. How would you apply a configuration change across all three environments? Well, unfortunately, it’s point and click with the AWS console. We don’t want to do that, so we’ll use something else, a tool called Pulumi. True infrastructure as code.
Why Pulumi?
Let’s start by explaining the choice of Pulumi since it’s a relatively new tool. A catchy (and provocative) summary would be:
Pulumi is React for infrastructure
Instead of managing the infrastructure via the AWS console (easy to start, hard to manage), we will codify the infrastructure. The standard solution to this is using products such as CloudFormation or Terraform. These products are based on custom markup languages, you may have heard them referred to as “infrastructure as code”. However, that’s not accurate. There is no real “code”, instead there is “markup” either as JSON or YAML. What does that mean? It means that it’s very difficult to use programming concepts you’re familiar with. For example, refactoring a Terraform files becomes a copy’n’paste bonanza.
So how does Pulumi help? The promise is that you can write a Pulumi program in a familiar language (JS, TypeScript, Python). The Pulumi program can then be broken up, refactored, and unit tested – much like any other coding tool you’re familiar with. Declaring the infrastructure state you desire, much like you would declare React component structure you want rendered.
But how does a pulumi program look exactly?
Foreshadowing is all the jazz, so why not try some of that here.
Here is pulumi snippet that creates an S3 bucket called my-bucket on AWS.

Let’s get our hands dirty
Without further delay, let’s hit the road to a tech nirvana and get the answers you’ve all been looking for!
Starting with a ‘stock’ Create React App
So what’s the starting point of this journey? If you follow the create react app docs, you’ll see something like this
npx create-react-app my-app
cd my-app
npm build
This transpiles the sources and gives you a build/ directory – let’s have a look inside
$ ls build/
asset-manifest.json					logo512.png						service-worker.js
favicon.ico						manifest.json						static
index.html						precache-manifest.a6c522ff242ab9465073ffb9aae702c8.js
logo192.png						robots.txt
But what do you do with that? These are some interesting questions:
- How do you get your precious creation into the cloud?
- How to ensure that as you push updates to your app clients get the latest version?
There are some big questions there, in particular which cache directives to set for the files in build/. These settings will be super important for the browser. We’ll cover all of that later once we have the nuts and bolts ready.
Can these topics feel confusing and annoying? Hell yeah. Have you ever seen them covered in create react app documentation? Hell no.
Getting setup with Pulumi
To avoid setting up resources in AWS console by hand, we’ll use Pulumi to write little programs that setup resources on the AWS cloud. These programs are declarative and can be written in any language of your choice, so it’s very easy to do.
What’s a Pulumi program? Program: a collection of files written in your chosen programming language
Here we’ll be sticking with Typescript (consistent with create react app).
https://www.pulumi.com/docs/get-started/aws/begin/
What’s the first decision we need to make? It’s deciding where to put the Pulumi code managing our infrastructure. Let’s create a new directory ‘pulumi’, alongside the ‘build’ directory.
$ mkdir pulumi
$ ls
README.md	build		node_modules	package.json	public		pulumi		src		yarn.lock
$ cd pulumi
Then let’s login into Pulumi, here we’ll us a local file to store the state of the project. This is okay for individual work and tinkering but gets insufficient once multiple people contribute to the project.
$ pulumi login file://...
So why not get started and create a new Pulumi project? Here is the command you need to run and the expected output.
What’s a Pulumi project? Project is a directory containing a program, with metadata, so Pulumi knows how to run it
$ pulumi new aws-typescript
This command will walk you through creating a new Pulumi project.

Enter a value or leave blank to accept the (default), and press <ENTER>.
Press ^C at any time to quit.

project name: (pulumi) my-app
project description: (A minimal AWS TypeScript Pulumi program)
Created project 'my-app'

stack name: (dev)
Enter your passphrase to protect config/secrets:
Re-enter your passphrase to confirm:
Created stack 'dev'
Here is a little asciicast to show you how this step will look like.

Now we need to configure our region of choice, here we’ll opt for eu-west-1 but it doesn’t matter what you choose here (us-west-1 or any other will do just fine).
pulumi config set aws:region eu-west-1
This command also creates our first stack – called “dev” – it will hold the state of the infrastructure we maintain.
What’s a Pulumi stack? Stack is an instance of your project, each often corresponding to a different cloud environment
Well done, that’s how we setup a Pulumi and project boiler plate. Let’s create our first stack – it will hold the state of the infrastructure we maintain.
Defining an S3 bucket
Before we jump in, let’s have a look around what we got at this step. There should now be a first Pulumi program in index.ts, let’s have a look inside:
import * as pulumi from "@pulumi/pulumi";
import * as aws from "@pulumi/aws";
import * as awsx from "@pulumi/awsx";

// Create an AWS resource (S3 Bucket)
const bucket = new aws.s3.Bucket("my-bucket", {
    acl: "public-read",
    website: {
        indexDocument: "index.html",
    },
});

// Export the name of the bucket
export const bucketName = bucket.id;
This is too simple for what we want to do eventually but good enough for now.
Let’s get this miniature to work – if there are any problems in your Pulumi config you’ll catch them now. What’s better than incremental progression, when you’re breaking new ground and trying not to get lost?
To get Pulumi to show you the available stacks (dev, production, testing), just run
$ pulumi stack ls
NAME  LAST UPDATE  RESOURCE COUNT
dev*  n/a          n/a
If you want to jump more into the Pulumi nomenclature, here is a great introduction
Creating an S3 bucket
Now we should be ready to get our first piece of infrastructure setup in Pulumi!
To get Pulumi to create the stack on AWS, just run pulumi up:
$ pulumi up
Previewing update (dev):
     Type                 Name        Plan
 +   pulumi:pulumi:Stack  my-app-dev  create
 +   └─ aws:s3:Bucket     my-bucket   create

Resources:
    + 2 to create

Do you want to perform this update? yes
Updating (dev):
     Type                 Name        Status
 +   pulumi:pulumi:Stack  my-app-dev  created
 +   └─ aws:s3:Bucket     my-bucket   created

Outputs:
    bucketName: "my-bucket-6daefdf"

Resources:
    + 2 created

Duration: 11s

Permalink: file:///Users/jandom/.pulumi/stacks/dev.json
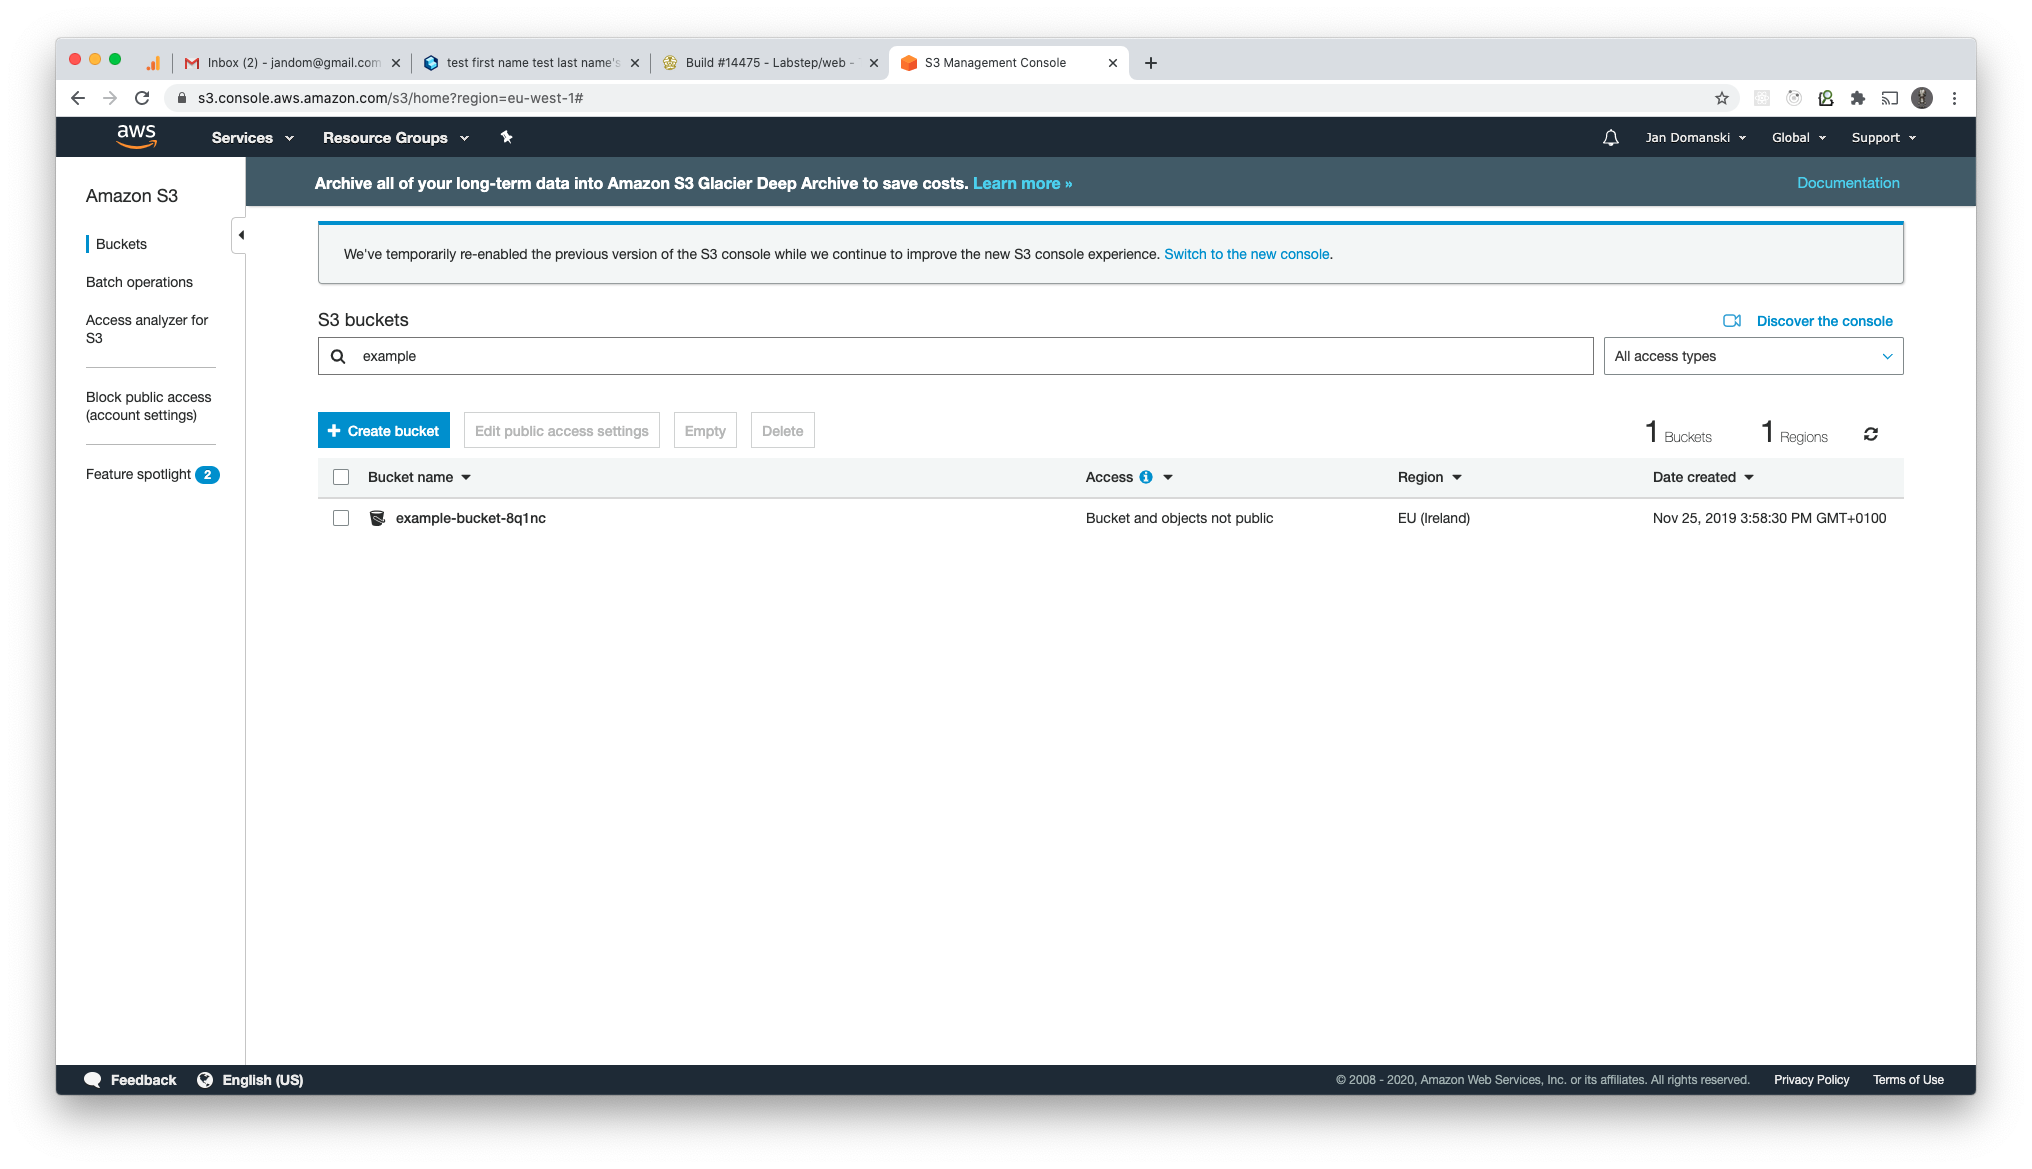
Pulumi says it’s all done – but can you trust it? Heading over to AWS console, you should see the bucket created and confirm it has been created.
Publishing contents to the S3 bucket
We have an S3 bucket but now let’s get the Create React App into it.
How can we accomplish that? Well, we’ve got the build/ directory and we’ve got a bucket on S3.
Let’s sync the contents of build with the S3 bucket using the aws s3 cp command
What’s in the newly bucket? Well, unsurprisingly, nothing.
$ aws s3 ls s3://my-bucket-f01e841
Yup, nada. So let’s get some stuff in there! What could be easier?
$ aws s3 cp build/ s3://my-bucket-f01e841 --recursive --exclude *.map
upload: build/favicon.ico to s3://my-bucket-f01e841/favicon.ico
upload: build/index.html to s3://my-bucket-f01e841/index.html
upload: build/service-worker.js to s3://my-bucket-f01e841/service-worker.js
upload: build/robots.txt to s3://my-bucket-f01e841/robots.txt
upload: build/manifest.json to s3://my-bucket-f01e841/manifest.json
upload: build/precache-manifest.a6c522ff242ab9465073ffb9aae702c8.js to s3://my-bucket-f01e841/precache-manifest.a6c522ff242ab9465073ffb9aae702c8.js
upload: build/asset-manifest.json to s3://my-bucket-f01e841/asset-manifest.json
upload: build/static/css/main.5f361e03.chunk.css to s3://my-bucket-f01e841/static/css/main.5f361e03.chunk.css
upload: build/logo192.png to s3://my-bucket-f01e841/logo192.png
upload: build/logo512.png to s3://my-bucket-f01e841/logo512.png
upload: build/static/js/2.a430f49c.chunk.js.LICENSE.txt to s3://my-bucket-f01e841/static/js/2.a430f49c.chunk.js.LICENSE.txt
upload: build/static/js/main.4f4a69a4.chunk.js to s3://my-bucket-f01e841/static/js/main.4f4a69a4.chunk.js
upload: build/static/js/runtime-main.f8c5b4be.js to s3://my-bucket-f01e841/static/js/runtime-main.f8c5b4be.js
upload: build/static/media/logo.5d5d9eef.svg to s3://my-bucket-f01e841/static/media/logo.5d5d9eef.svg
upload: build/static/js/2.a430f49c.chunk.js to s3://my-bucket-f01e841/static/js/2.a430f49c.chunk.js
Now that was easy… but is that what we want?
Well… Everything in build got published so that’s good news.
We excluded *.map files which you may want to keep private.
Also what about the caching settings used by browsers?
There is only one way to find out: with the swiss-army knife of all things web, cURL
$ curl https://my-bucket-f01e841.s3-eu-west-1.amazonaws.com/index.html
<?xml version="1.0" encoding="UTF-8"?>
<Error><Code>AccessDenied</Code><Message>Access Denied</Message><RequestId>079C0D51FEE2F8E1</RequestId><HostId>FPIAUu0YGJ1XEyCTuJPdSWiAQGBLkC7ftzbraMq4FchBUo7kEv8MTjoemmXumaiyIffhTv/ikMk=</HostId></Error>
Now that’s a funny thing: the S3 bucket contents are not available to us by default. They are private. We can certainly change that!
aws s3 rm s3://my-bucket-f01e841/ --recursive

aws s3 cp build/ s3://my-bucket-f01e841 \
  --recursive \
  --exclude *.map \
  --exclude index.html \
  --cache-control max-age=31536000 \
  --acl public-read

aws s3 cp build/index.html s3://my-bucket-f01e841/index.html \
  --metadata-directive REPLACE \
  --cache-control no-cache,no-store \
  --content-type text/html \
  --acl public-read
And with any luck, all of these files should upload to S3 with new cache-control headers. Let’s verify how things are working by requesting index.html
$ curl http://my-bucket-f01e841.s3-eu-west-1.amazonaws.com/index.html -v
...
< Cache-Control: max-age=0,no-cache,no-store,must-revalidate
...
<!doctype html><html lang="en"><head><meta charset="utf-8"/><link rel="icon" href="/favicon.ico"/>...
Importantly, the root page is also working (redirecting to index.html).
We can verify that with cURL again
$ curl -v http://my-bucket-f01e841.s3-website-eu-west-1.amazonaws.com
* Rebuilt URL to: http://my-bucket-f01e841.s3-website-eu-west-1.amazonaws.com/
*   Trying 52.218.60.172...
* TCP_NODELAY set
* Connected to my-bucket-f01e841.s3-website-eu-west-1.amazonaws.com (52.218.60.172) port 80 (#0)
> GET / HTTP/1.1
> Host: my-bucket-f01e841.s3-website-eu-west-1.amazonaws.com
> User-Agent: curl/7.54.0
> Accept: */*
>
< HTTP/1.1 200 OK
< x-amz-id-2: VKg+mTQ8wGUge3GzLx9J1BN+cBUNmbQuixY95AZ4wgV4U7H9fKF3v8is1ms6tUTalGIEUMwEW+Y=
< x-amz-request-id: 1ZAT1PAWEP0MFXAR
< Date: Wed, 29 Jul 2020 19:11:31 GMT
< Cache-Control: max-age=0,no-cache,no-store,must-revalidate
< Last-Modified: Tue, 28 Jul 2020 19:57:17 GMT
< ETag: "67e4d5da5073a0ba60ce72a01c3feee4"
< Content-Type: text/html
< Content-Length: 2219
< Server: AmazonS3
<
* Connection #0 to host my-bucket-f01e841.s3-website-eu-west-1.amazonaws.com left intact
<!doctype html><html lang="en"><head><meta charset="utf-8"/>
Caching settings
Following this StackOverflow thread, we’ll follow similar defaults https://stackoverflow.com/questions/49604821/cache-busting-with-cra-react
Using Cache-Control: max-age=31536000 for your build/static assets, and Cache-Control: no-cache for everything else is a safe and effective starting point that ensures your user’s browser will always check for an updated index.html file, and will cache all of the build/static files for one year. Note that you can use the one year expiration on build/static safely because the file contents hash is embedded into the filename.
This is a much wider topic and we’ll only stick to the simplest solution. Searching around for best practices might give you some ideas for what to do depending on your situation.
Conclusions
That brings us to a conclusion, we have a rudimentary setup for hosting a Create React App. With a single bucket we can serve contents using HTTP requests. This is a far cry from what we want, it’s hard to expect users to access your website by the bucket URL! What’s next in this series? Well, we need to connect the S3 bucket to a Route53 record. Then, some considerations about load and caching will follow, showing how CloudFront can be used to cache the contents of your S3 bucket. But that’ll all come later!
What’s next?
This was a simple intro to publishing a Create React App to AWS S3 via Pulumi. It’s rudimentary and not suitable for a production-level workload. Which components to add next? Checkout the second blog post in the series on how to connect Route 53 with our Create React App.
Credits
Big big thanks to my colleagues
For helping me review and improve this post.